
I’m sure you’ve sent an email and, right after hitting Send, spotted a typo, forgotten an attachment, or realised you emailed the wrong person, just like the rest of us. Luckily, Outlook can help. It gives you a small safety window before your email actually leaves your outbox. Think of it as a short “cooling off” period: you click Send, but Outlook waits a couple of minutes before delivering the message.
Here, we’ll show you exactly how to set it up.
Quick note before we start
This “delay everything you send” setup works in Classic Outlook for Windows (the desktop app). If you are using New Outlook for Windows or Outlook on the web, you can still schedule individual emails, but the “delay all outgoing mail with a rule” option is not available in the same way.
Now, let’s set up the delay.
What you are setting up
You will create a rule that applies to every email you send, and tells Outlook:
“Hold this message in the Outbox for X minutes, then send it.”
During that delay, you can open the message, edit it, or delete it.
Step 1: Open Rules and Alerts
- Open Outlook (Classic) on your Windows computer.
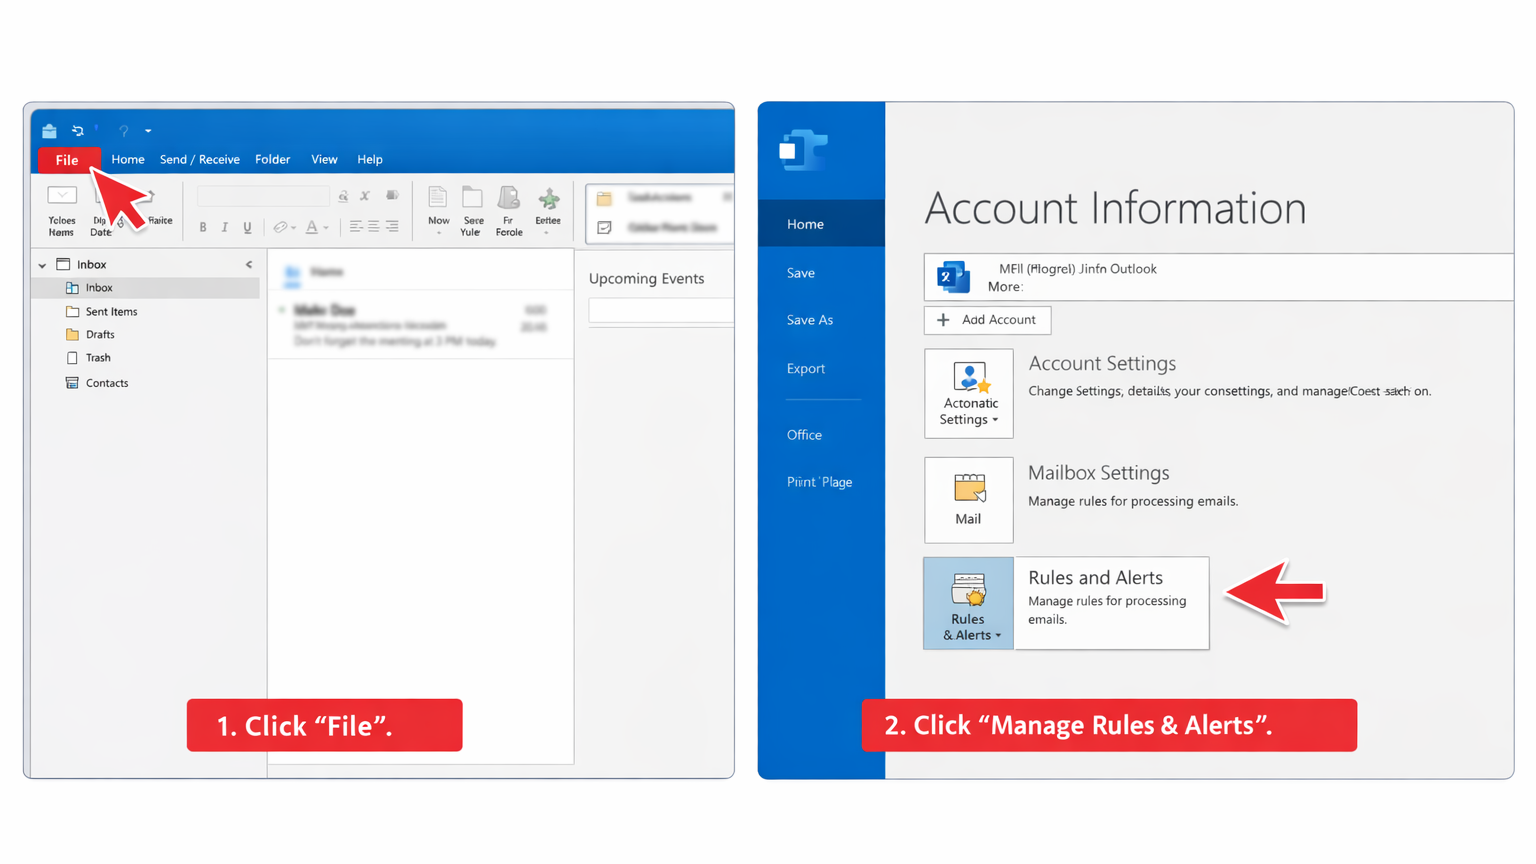
- Click File in the top left corner.
- Select Manage Rules & Alerts.
You should now see a window called Rules and Alerts.
Step 2: Start a new rule
- Click New Rule.
- Under “Start from a blank rule”, select Apply rule on messages I send.
- Click Next.
Step 3: Apply it to all outgoing messages
Outlook will ask which conditions you want to check.
- Leave all the boxes unticked.
- Click Next.
- Outlook will pop up a message confirming this will apply to every email you send.
- Click Yes.
This is the moment you are telling Outlook: “Yes, I really do want a delay on everything.”
Step 4: Choose your delay time
Now you choose what Outlook should do with those outgoing messages.
- Tick defer delivery by a number of minutes.
- Look at the lower part of the window. You will see underlined text that says a number of.
- Click that underlined text.
- Type the number of minutes you want, then click OK.
A practical choice is 2 to 5 minutes. Long enough to catch mistakes, short enough to not slow you down.
- Click Next.
Step 5: Add exceptions (optional, but very handy)
This step lets you say: “Delay most messages, except these ones.”
For example, you might choose exceptions such as:
- messages marked High Importance
- messages sent to a specific person or group
- messages sent only to yourself
Pick any exceptions you want, then click Next.
If you do not need exceptions, just click Next without selecting anything.
Step 6: Name the rule and switch it on
- Give the rule a clear name, such as Delay sending by 3 minutes.
- Make sure Turn on this rule is ticked.
- Click Finish, then OK.
You are done.
How it works day to day
After you set this up, nothing changes about how you write emails. You still click Send as normal.
The difference is what happens next.
Your email will sit in Outbox for the number of minutes you chose. When the time is up, Outlook sends it automatically.
How to undo or edit an email during the delay
This is the whole reason you set the rule up, so it is worth knowing where to look.
- In Outlook, click Outbox in the left hand folder list.
- Double click the email you want to change.
- Make your edits, then click Send again.
Want to stop it completely? Delete the message from Outbox.