
When you’re juggling multiple meetings and diverse teams, having Microsoft Teams meeting transcription and live caption can be a real lifesaver. It keeps everyone on the same page, ensures no detail slips through the cracks, and makes your meetings more accessible to those who speak different languages. The good news is that setting these features up in Microsoft Teams is straightforward, whether you’re using the web browser version or the desktop app—the steps are nearly identical. Here’s a simple, step-by-step guide to get you started.
What are Live Captions in Teams?
Live Captions in Microsoft Teams is a real-time accessibility feature that converts speech into on-screen text as your meeting unfolds. Rather than relying on memory or manual note-taking, participants can read along with what is being said, directly on their screen and as it happens. This is different from meeting transcription, which creates a saved record of the full conversation after the meeting. Live Captions are designed to support engagement in the moment, making it easier to follow along even if audio quality is poor, you are in a noisy environment, or you simply prefer reading alongside listening. The feature also helps those who are deaf or hard of hearing participate more fully in live meetings, and it supports non-native speakers who benefit from seeing words written out in real time.
How to Enable Live Captions in a Teams Meeting?
Enabling live captions during a Microsoft Teams meeting takes just a few clicks. Here is how to do it:
Step 1: Join or Start Your Meeting
Open Microsoft Teams and join a scheduled meeting, or start one directly from the app or browser.
Step 2: Open the ‘More’ Menu
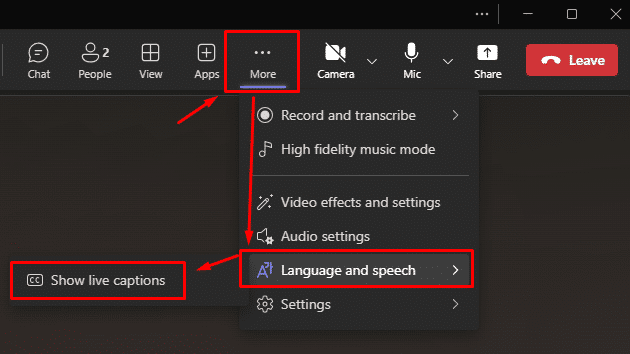
Once inside the meeting, move your mouse over the meeting window to reveal the meeting controls toolbar. Click the three dots icon labelled ‘More’.
Step 3: Turn on Live Captions
From the dropdown menu, select ‘Turn on live captions’. Captions will appear at the bottom of your screen almost immediately.
Step 4: Check Your Language settings
If the captions aren’t matching the spoken language correctly, go back to the ‘More’ menu and select ‘Captions and transcript settings’. From here you can update the spoken language so Teams captures speech accurately.
Note: Live Captions are visible only to you by default, other participants will not know you have turned them on unless you tell them.
When to Use Live Captions in Teams?
There are many situations where Live Captions can help facilitate communication in Teams Meetings. Here are a few common examples.
Working in busy places: Live captions help you work in busy offices and cafés where there is a lot of background noise.
Poor Audio Quality: Captions enable communication where audio is disrupted by connectivity issues by providing real-time updates.
Accessibility Needs: Live captions accommodate meetings for accessible participants (especially for those who cannot hear or experience difficulty hearing or processing audio).
Non-native English Speakers: Live captions assist in understanding audio and in processing non-native languages.
High-concentration Meetings: Decisions and details are important. Captions assist in audio and visual comprehension in processing details.
Recording or Compliance Contexts: Captions are important for transcription and visibility during meetings in regulated industries.
Step-by-Step: Setting Up Transcription and Full Features
Setting up Teams Transcription is simple with a few simple steps:
1- Confirm Your Permissions and Licences
Before you dive in, make sure you have the right permissions. Typically, meeting transcription is enabled by default if you’re on a Microsoft 365 E3, E5, Business Standard, or Business Premium plan. However, if you find that the transcription options aren’t showing up, you may need to ask your IT admin to check the organisation’s Teams policies.
What to check:
- Microsoft Teams Admin Centre: Your admin will need to ensure that “Allow transcription” is switched on in the meeting policies.
- Licences: Confirm that you are on a plan that supports transcription and live captioning.
2- Launch Microsoft Teams in Your Browser
Open Teams in your preferred web browser—Microsoft Edge and Google Chrome typically work best. Sign in with your work or school account and join or start a scheduled meeting as you normally would.
3- Start the Meeting Transcription
Once everyone has joined, it’s time to start the transcription so you can have a text-based record of what’s said during the meeting.
How to do it:
- Open the Meeting Controls: Move your mouse over the Teams meeting window to reveal the toolbar at the top (or bottom, depending on your view).
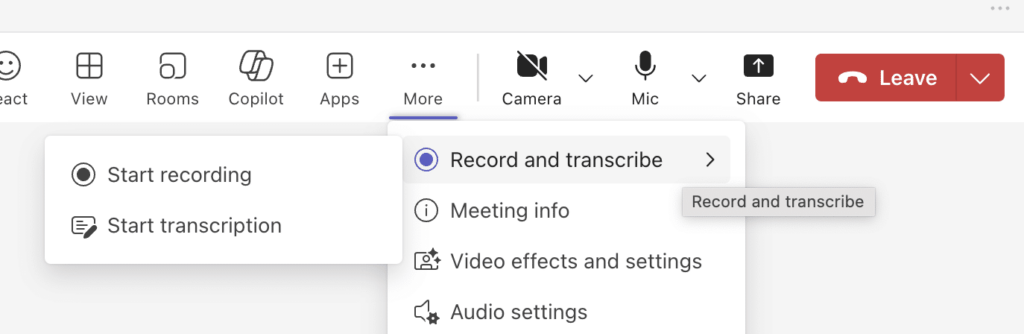
- Click “More” (the three dots icon): This opens a drop-down menu with additional meeting options.
- Select “Start transcription”: You’ll see a prompt letting everyone know that transcription has begun. The transcript panel usually appears on the right-hand side of the screen.
4- Enable Live Captions
If you’d like to read what people are saying as they speak, turn on live captions. This feature displays real-time text at the bottom of your screen, making it easier to follow along even if your audio is less than perfect.
How to do it:
- Click “More” (three dots) again: From the same menu, select “Turn on live captions.”
- Check the Language Settings: If needed, choose the spoken language so Teams can accurately capture what’s being said.
5- Add Translation for Greater Accessibility
One of Teams’ handiest features is its ability to translate captions into different languages. This is particularly useful if you’re working with global teams or clients.
How to do it:
- Go to the Captions and Transcript Settings: Click on the “More” menu, then select “Captions and transcript.”
- Choose Your Language: Look for “Spoken language” or similar settings, then pick the language you’d like the captions translated into. Teams will do its best to provide a near real-time translation of what’s being said.
6- Review Your Transcript After the Meeting
Once the meeting wraps up, you don’t have to worry about scrambling to piece together your notes. The full transcript is saved automatically in Teams. You can revisit the meeting details, search for keywords, and confirm what was said—perfect for follow-up actions or sharing with teammates who couldn’t attend.
How to do it:
- Open the Meeting in Teams: Go to the Teams calendar or chat history where the meeting was held.
- View the Transcript: Click on the meeting, then open the transcript from the details tab.
7- Troubleshooting Tips
- If transcription or captions don’t appear: Check with your admin to ensure they’re enabled.
- If translations seem off: Double-check the chosen language. Sometimes picking a more general language variant can help.
- If browser issues arise: Try switching to a supported browser like Microsoft Edge or update to the latest browser version.
FAQ
Below are some frequently asked questions around transcription and Microsoft Teams:
Can I Transcribe a Teams Meeting Without Recording It?
Absolutely! You can add a transcription without recording the meeting. In Teams, transcription and recording work independently. Some organisations prefer transcription due to privacy concerns over video recordings. To transcribe a Teams meeting without a recording, go ahead and choose ‘Start transcription’ with ‘Start recording’ unselected.
What Data Does Teams Use to Create the Captions?
As the audio data is processed by Teams in real time, it uses the microphone input data on the user’s device. For each meeting, Teams transmits this audio data to the cloud and applies speech recognition to convert it into text. The audio data from the meetings that are used to develop captions is not utilised to improve AI for the end-users who are in a protected enterprise data agreement. As for organisations with specific data processing compliance requirements, it is recommended that you discuss this with your IT admin.
How Do Teams Translate Live Captions?
For someone who conducts Teams meetings in a different language, Teams offers the ability to translate the live captions to the language of your choice. Captions are generated in real time, as Teams uses its proprietary translation software, which is a component of Microsoft Azure Cognitive Services. In order to use this feature, one must first enable live captions. Next, you must go to the settings where you will choose the language you wish to hear in the meeting and the language to which you want the captions translated. Teams will then process the spoken language and translate it to the display language.
Looking for More Advanced Features?
If you’re finding it challenging to set up Microsoft Teams meeting transcription and live captions, Lucidica is here to help.
if you’re looking to go beyond the basics, it’s worth exploring Microsoft Teams Co-pilot. Unlike standard transcription services, Co-pilot can generate thorough meeting summaries, highlight key action points, and pull out the most important details—saving you valuable time and helping your team stay focused on what truly matters.
For those seeking expert guidance and advanced features, Lucidica can provide Microsoft Co-pilot licenses to help elevate your Microsoft Teams experience.